

Four Calibrated Ways to Get Your Ring Size Right
The quickest reliably accurate way to find your ring size is to measure an existing ring on a screen calibrated with a credit card, or use a printable sizer verified at 100 percent scale. If neither is available, a snug paper strip converted to millimeters works almost as well. Confirm with a jeweler before ordering anything that cannot be resized, like an eternity band or a low-carat alternative metal.
TL;DR:
- Accurate at-home measurement tools include printable sizers, calibrated screen apps, existing rings, and string or paper wraps, each with specific limitations.
- Calibration checks, such as verifying printed scale bars or credit card calibrations, are essential for maintaining measurement accuracy.
- Fingers swell throughout the day, so measuring in the morning and evening and averaging results improves sizing precision, especially for non-resizable rings.
- Conversion of measurements across systems relies on calculating the inner circumference using the formula C = pi times diameter, with half sizes rounding up.
- For non-standard shapes, children’s fingers, or large knuckles, sizing adjustments or slightly loose fits are recommended to ensure comfort and proper fit.
Table of Contents
- Which At-Home Ring Sizing Tools Actually Work?
- How Do You Measure Your Ring Size Step by Step?
- How Do Ring Sizes Convert Across Systems?
- Why Might Your At-Home Measurement Be Off?
- Sizing Support Behind Every Antonio Guzzo Piece
- What About Adjustable or Open-Ended Rings?
- How Should You Size Rings for Kids or Unusual Finger Shapes?
- A Practical Checklist for Getting Your Size Right
- Get Your Size Right, Then Get the Ring
- Sources
Which At-Home Ring Sizing Tools Actually Work?
Four tools cover almost every situation, and each fits a different scenario better than the others.
- Printable PDF sizers work best when you own a printer and want a physical reference you can slip onto your finger. Accuracy depends entirely on printing at true scale.
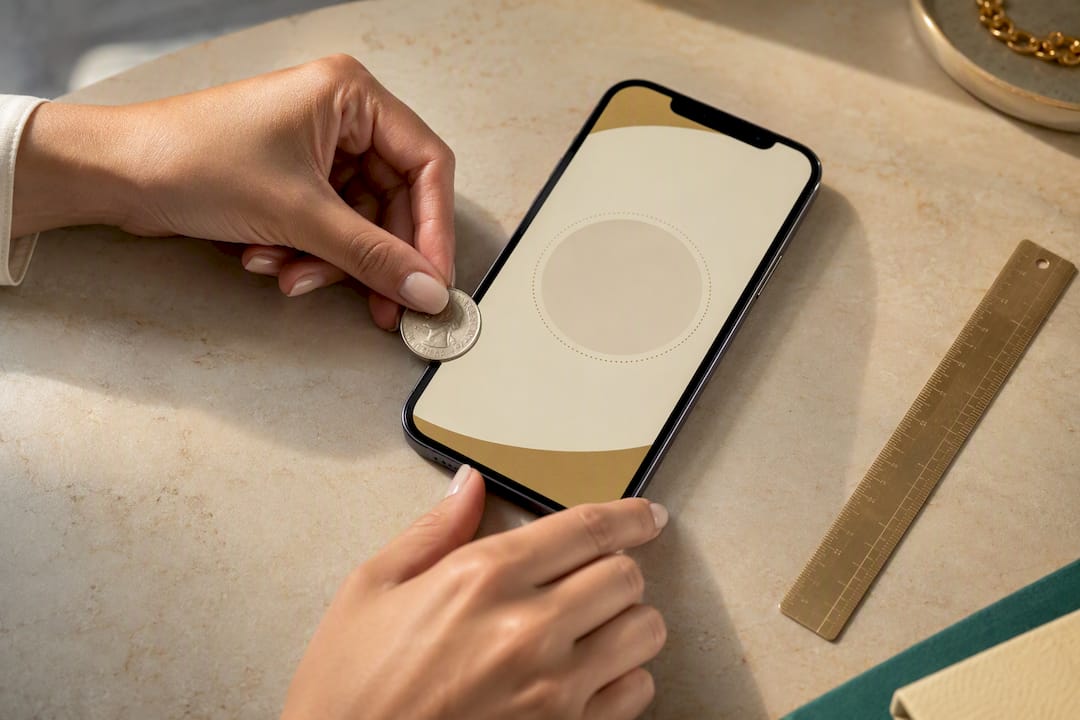
- Screen-calibrated apps are the fastest option when you’re on your phone or laptop and don’t have a printer nearby. You calibrate once against a credit card or coin, then measure directly on the display.
- Paper or string wrap is the lowest-tech option and the most forgiving when you’re short on tools, but it carries the widest margin for error.
- Measuring an existing ring gives you a stable, repeatable number if you already own something that fits the finger in question.
Home measurement typically carries an error margin of about 0.1 to 0.3 millimeters, which can equal roughly half a size depending on where you fall on the conversion chart. That’s tight enough for casual jewelry, but worth double-checking on anything expensive.
Two calibration checks matter more than the tool itself. First, if you’re printing a sizer, look for the printed scale bar (usually 30mm or 1 inch) and measure it with a ruler before trusting the rest of the page. Second, if you’re using a screen tool, calibrate with a real credit card or US quarter every time you switch devices, since screen resolution varies enough to throw off the reading. Calibrated screen tools that save your device-specific calibration tend to hold accuracy across repeat measurements, which makes them a solid go-to if you don’t own a printer.
How Do You Measure Your Ring Size Step by Step?
Each method takes under five minutes once you know the sequence.
Printable sizer:
- Set your print dialog to “actual size” or 100 percent. Never let it auto-scale to fit the page.
- Measure the printed scale bar with a ruler to confirm it matches the labeled length exactly.
- Cut out the sizer and assemble it according to the printed instructions.
- Slide it to the base of your finger, not over the knuckle, and read the size where it meets snugly.
Screen app:
- Calibrate using a credit card or US quarter held flat against the screen.
- Place an existing ring or your finger directly on the display at the marked calibration zone.
- Match the inner edge of the ring or finger to the on-screen guide.
- Read the converted size across US, UK, and EU scales.
Existing ring:
- Measure the internal diameter across the inside edge with a ruler or caliper.
- Multiply that diameter by π (3.14159) to get circumference, or check it against a millimeter-based conversion chart.
Paper or string:
- Wrap it snugly around the base of your finger.
- Mark where it overlaps.
- Lay it flat against a ruler starting at zero and read the circumference in millimeters.
- Convert that number to a size using a standard chart.
Pro Tip: Measure twice, ideally once in the morning and once in the evening, then average the two results. Fingers swell throughout the day, so a single reading can skew your final size by half a step.
How Do Ring Sizes Convert Across Systems?
Every ring size system, whether it’s a US number, a UK letter, an EU circumference, or a Japanese numeral, describes the same physical measurement: the inner circumference of the band. Converting through millimeters removes the guesswork, since circumference equals π times diameter, or C = π × d. That single formula is why a 16.5mm inner diameter always lands at the same spot no matter which country’s chart you’re reading.
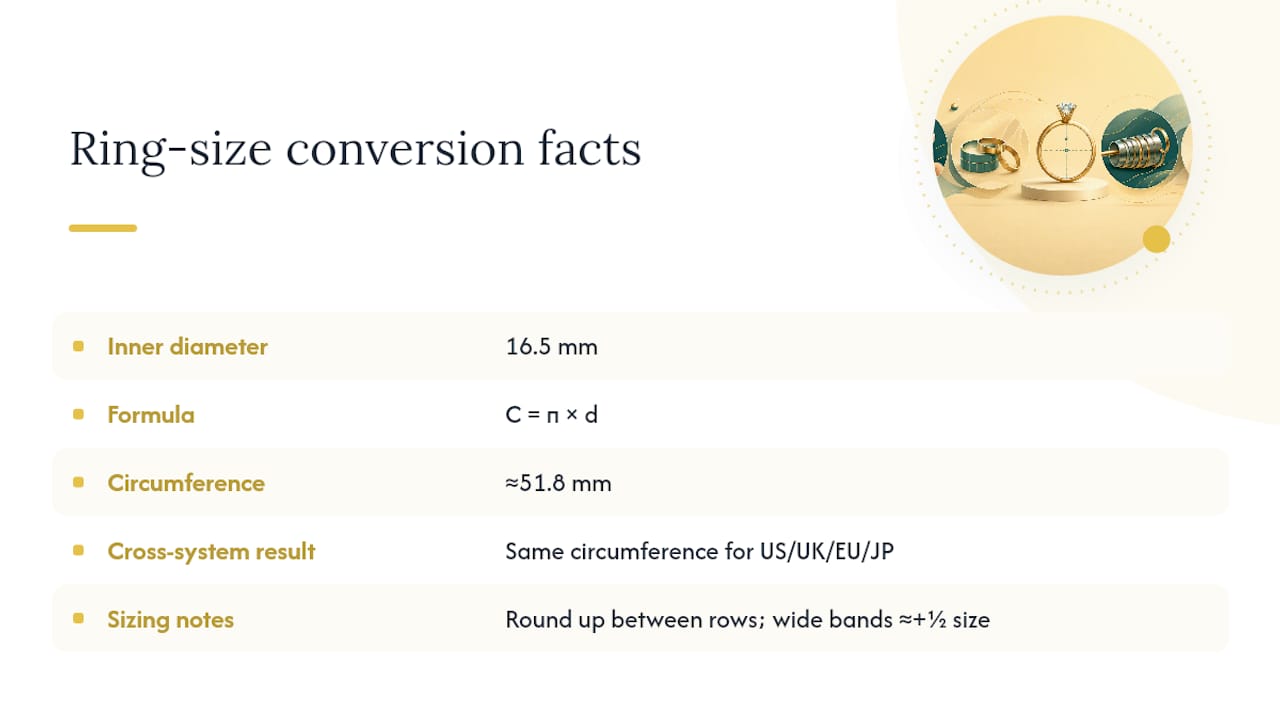
Half sizes fall a small fraction of a millimeter apart in diameter, so if your measurement lands between two rows, round up rather than down. Wide bands change the math slightly: anything 6mm or wider typically needs about half a size larger than a thin band would, since more metal contacts the finger and reduces how far it can stretch over the knuckle.
Why Might Your At-Home Measurement Be Off?
Most sizing mistakes come down to a handful of repeatable errors, not bad luck.
- Printing a sizer at “fit to page” instead of 100 percent scale, which silently shrinks or stretches the entire chart.
- Photographing a ring at an angle for screen measurement, which introduces parallax and skews the reading.
- Measuring over the knuckle instead of at the base of the finger, which almost always returns a size too large.
- Taking a single measurement instead of comparing readings from different times of day.
Timing affects accuracy more than most people expect. Fingers swell with heat, salt intake, exercise, and time of day, so measuring later in the afternoon or evening after your hands have warmed up gives a more honest number than a cold morning reading.
For everyday rings, a careful at-home measurement is usually good enough. But for engagement rings, eternity bands, or any non-resizable setting, confirm your number with a jeweler’s metal mandrel before ordering. Some metals and intricate settings resist resizing entirely, so a wrong guess there is far costlier than on a simple band.
Pro Tip: If you’re sizing for a surprise gift, “detective” methods like tracing an existing ring the person owns are useful but come with wider error margins. Treat the result as a strong estimate, not a final number.
Sizing Support Behind Every Antonio Guzzo Piece
Antonio Guzzo Fine Jewelry builds every ring by hand, blending Italian craftsmanship with ethically sourced gemstones, including the natural Colombian emeralds at the center of the Signature Collection. Each piece is made to be worn for decades, not seasons, which is exactly why getting the size right before you order matters.
Customers can reach out before purchasing for guidance on matching a printed or screen measurement to the correct size, and resizing support is available after the fact for pieces where the metal and setting allow it. Every order ships free, so there’s no added cost tied to getting sizing help along the way.
What About Adjustable or Open-Ended Rings?
Adjustable and open-ended rings sidestep most of the sizing math above, but they come with their own rules. Because the band has a gap or a flexible section, you’re working with a range rather than a fixed number, typically spanning two to three US sizes.
Measure your finger the same way you would for a fixed band, then check the product listing for its stated range rather than trying to match an exact size. If your measurement falls near the edge of that range, size toward the smaller end. Open bands tend to loosen slightly with wear as the metal flexes open over time, so starting snug keeps the ring from sliding around a month later.
One caution: adjustable bands aren’t a substitute for proper sizing on rings meant for daily wear, especially anything with a stone setting. The flexible design that makes them convenient also makes them less structurally secure than a fixed band, so they suit statement pieces and stacking rings better than an everyday engagement ring or wedding band. If you’re set on a fixed-size ring but unsure between two sizes, sizing up is almost always the safer call since a ring that’s slightly loose can be adjusted with a sizing bead, while one that’s too tight often can’t be worn at all.
How Should You Size Rings for Kids or Unusual Finger Shapes?
Children’s fingers grow fast, which makes standard sizing charts less useful than they are for adults. Measure right before purchase rather than weeks ahead, and expect to resize or replace the piece within a year or two as growth continues. Many families intentionally size slightly loose and add a small silicone spacer instead of committing to a permanent resize on a child’s ring.
Non-standard finger shapes need a different kind of attention. If you have a larger knuckle than the base of your finger, the ring needs to slide over the widest point without feeling impossible to remove later. Measure both the knuckle and the base, then look for a size that sits between the two rather than matching either one exactly. Arthritic joints or fingers that swell more than usual benefit from the same approach: measure at the largest point of the day, and lean toward a slightly looser fit rather than a snug one that becomes painful to remove during a flare.
For any of these situations, a flexible or slightly adjustable band width can make daily wear far more comfortable than a rigid standard-width ring. If you’re shopping for someone with a non-standard finger shape and can’t get a direct measurement, err generously and plan for a resize once you can confirm the fit in person.
A Practical Checklist for Getting Your Size Right
My honest read after walking through every method here: skip the string if you have any alternative. A calibrated screen tool or a properly printed sizer removes the two biggest sources of error, guesswork on scale and inconsistent tension, and takes about the same amount of time. Save paper and string for when you genuinely have nothing else on hand.
Run through this before you order: calibrate your tool with a credit card or printed scale bar, measure twice at different times of day, average and round to the nearest size, adjust upward for wide bands or a large knuckle, and confirm with a jeweler before committing to anything non-resizable. If you get stuck at any step, Antonio Guzzo Fine Jewelry’s customer support can walk through your measurement with you directly.
— Angelo
Get Your Size Right, Then Get the Ring
Antonio Guzzo Fine Jewelry skips the guesswork that comes with generic mall jewelry sizing charts. Every ring is handcrafted with ethically sourced gemstones, and once you’ve confirmed your size using the methods above, our team can double-check your measurement before your order ships, at no extra cost, with free shipping on every piece.

If you’re shopping for something with real staying power, the Classic Colombian Emerald Ring in 18K Gold pairs natural Colombian emeralds with solid gold craftsmanship built to last generations. Not sure your measurement is exact? Reach out to customer support with your calibrated number before checkout, and they’ll confirm it fits the specific setting you’re ordering. Browse the full rings collection to find a piece worth measuring twice for.
Sources
- Ring Size Chart & Converter US, UK, Japan, EU | Rings Sizer
- Ringsize
- Find your ring size — Tembrica ring size calculator
- Ring Size Chart & Converter (mm & inches) — Sizepedia
Recommended
- The Ultimate Guide to Choosing Jewelry for Any Occasion
- Choosing between 14K or 18K Jewelry, We’re Here To Help.
- Trilogy Ring: Symbolism and Romance
- Fine Jewelry vs. Fashion Jewelry: What’s the Difference?